


Frequently Asked Questions
For Provider & Practice Staff
For quick solutions, we have provided answers to our most frequently asked questions.
How do I log into the Provider Portal?
How do I add a patient into Ellipsas?
How do I search for a patient in Ellipsas?
How do I add a patient appointment into the patient’s profile?
How do I change an appointment in the patient’s profile?
How do I re-send an enrollment email to a patient?
How do I download a PDF of the patient’s Wellness Report?
How do I review a patient’s assessment?
Patient Experience: How does a patient activate their account?
Patient Experience: What is the patient initial intake and assessment process?
Patient Experience: What is the patient prior to and between-appointment assessment process?
How do I log into the Provider Portal?
Access the Practice Portal through: provider.ellipsas.com/<practicename>
Login Option 1: If you have a Microsoft login, select “Sign In With Microsoft”. Enter your email address and select “Next”.

Check your email for a link to directly access the Provider Portal. You have six (6) minutes before the link expires. After six (6) minutes, you must request a new link.

Login Option 2: Enter your email address and select “Email me a sign in link”.

Check your email for a link to directly access the Provider Portal. You have six (6) minutes before the link expires. After six (6) minutes, you must request a new link.

Now that you are logged in, you are able to add additional users.
Note: Once logged into the Practice Portal, you will remain logged in unless you are inactive for one hour (60 minutes). After one hour, the page will remain open but your session will have expired, and you will have to login again to access the system.
How do I create practice logins for Providers, Mid-Level Providers, Clinical Assistants and additional Administrators?
Only practice personnel who have been given Administrator-level access into the Ellipsas Provider Portal by Ellipsas personnel are able to create additional logins.
Begin by logging into the Ellipsas Provider Portal.
Navigate to the “Practice” section from the top menu.

Adding another Administrator
Adding an administrator will provide the user the ability to add Providers, MLPs and Clinic Administrators. Administrators have access to all patient user data.
Select “Administrator” from the left-hand menu, then “Add Administrator” from the top-right hand corner.
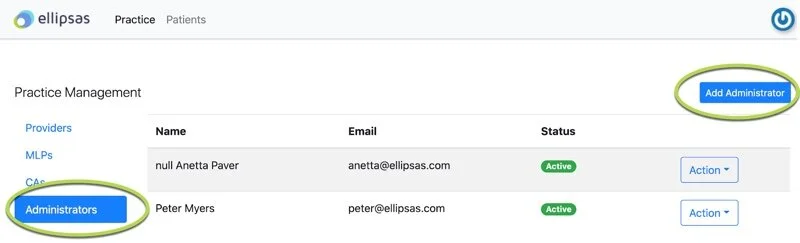
A popup will appear. Enter the users Prefix (optional), First Name, Last Name, and Email address.

The user will now be able to login to the Provider Portal as an Administrator.
Note: No email will be sent to the user, but the user will be able to access the Provider Portal by following the steps above.
Adding Providers
At least one provider is required in order to provide access to patients. Providers are able to see patient data on all patients associated with them, and with the Mid-Level Providers they are supervising.
Select “Providers” from the left-hand menu, then “Add Provider” from the top-right hand corner.

A popup will appear. Enter the users Prefix (optional), First Name, Last Name, Credentials and Email address. Then click “Save”.

The user will now be able to login to the Provider Portal as a Provider.
Note: No email will be sent to the user, but the user will be able to access the Provider Portal by following the steps above.
Adding Mid-Level Providers
Mid-Level Providers will have access to view patient data only for patients under their care.
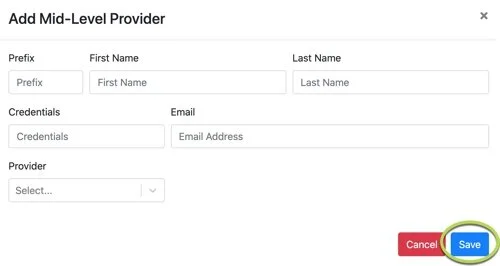
Select “MLPs” from the left-hand menu, then “Add MLP” from the top-right hand corner.

A popup will appear. Enter the users Prefix (optional), First Name, Last Name, Credentials, Email address and select the Supervising Provider (only one provider can be selected). Then click “Save”.
The user will now be able to login to the Provider Portal as an MLP.
Note: no email will be sent to the user, but the user will be able to access the Provider Portal by following the steps above.
Adding Clinical Assistants
Clinical Assistants will have access to view patient data only for patients under their care.
Select “CAs” from the left-hand menu, then “Add CA” from the top-right hand corner.

A popup will appear. Enter the users Prefix (optional), First Name, Last Name, Credentials, Email address and all associated Providers (more than one provider or MLP can be selected). Then click “Save”.

The user will now be able to login to the Provider Portal as a CA.
Note: No email will be sent to the user, but the user will be able to access the Provider Portal by following the steps above.
How do I add a patient into Ellipsas?
This training is for all practice clinicians who have been given access into the Ellipsas Provider. Providers, Mid-Level Providers, Clinical Assistants and Administrators are able to Add Patients to the Ellipsas System.
Make sure you are in the “Patient” section from the top menu, then “Add New”.

A popup will appear. Enter the patients’:
First Name
Middle Initial (optional)
Last Name
Email Address
Date of Birth
Cell Phone (optional, must be a cell phone number)
Provider (from the drop-down menu)
MRN number
Appointment Date (optional – an appointment date can be added at a later time, or entered when creating the patient account)
The Provider with whom the patient will meet during the appointment (if applicable)
Note: The Assessment Review Date will be auto-populated for 14 days after the Appointment Date.

The patient will immediately receive an email with a link to activate their patient account.
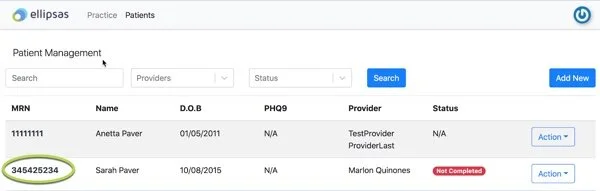
How do I search for a patient in Ellipsas?
Make sure you are in the “Patient” section from the top menu.

Find the patient you are looking for by:
Option 1: Entering the patient name into the Search bar then clicking “Search”.

Option 2: Selecting the Provider or MLP from the drop-down menu in the “Providers” search bar, then clicking “Search”.

Option 3: Selecting a patient status (Not Completed, Completed, Pending Review) from the “Status” search bar.
Not Completed: The patient has been issued an assessment but has not yet completed
Completed: The patient has completed the issued assessment, and the assessment has been reviewed by a member of the practice.
Pending Review: The patient has completed the issued assessment, but the assessment has not yet been reviewed by a member of the practice.

A list of patients who meet your criteria will appear.
Note: It is possible to add more than one search feature. (Ex. Enter a Provider and a Status)
How do I add a patient appointment into the patient’s profile?
Make sure you are in the “Patient” section from the top menu.

Find the patient you are looking for.
Click the MRN number of the patient for whom you are setting up an appointment.

The patients’ profile will appear. If they have already completed any assessments, their profile will display a series of scores and graphs. Select “New Appointment”.

A popup will appear. Select “Standard Appointment” as “Appointment Type” and enter the appointment date, and select the provider the patient will be seeing from the drop-down menu. Then click “Save”.

The patient will receive an email two (2) days prior to their scheduled appointment and 14 days following the scheduled appointment, asking them to complete their assessment scales.
How do I change an appointment in the patient’s profile?
Make sure you are in the “Patient” section from the top menu.

Find the patient you are looking for.
Click the MRN number of the patient for whom you are changing an appointment.

Scroll down to the “Appointments” section and select “Action” and then “Edit”.

Enter a new appointment date and select “Save”.

How do I re-send an enrollment email to a patient?
Make sure you are in the “Patient” section from the top menu.

Find the patient you are looking for.
Click the MRN number of the patient for whom you are setting up an appointment.

The patients’ profile will appear. If they have already completed any assessments, their profile will display a series of scores and graphs. Select “Send Onboarding”.

The patient will immediately receive an email in their inbox with instructions to Activate their Account.
How do I download a PDF of the patient’s Wellness Report?
Make sure you are in the “Patient” section from the top menu.

Find the patient you are looking for.
Click the MRN number of the patient for whom you are setting up an appointment.

Once in the patient’s profile, an overview of their scores will appear. Scroll to the bottom and select “Download”.

A PDF will appear in a new browser with the patient’s demographic report.

How do I review a patient’s assessment?
Make sure you are in the “Patient” section from the top menu.

Find the patient you are looking for.
Click the MRN number of the patient for whom you are looking for.
Once in the patient’s profile, an overview of their scores will appear. Scroll to the bottom and select “Review”.

The patient assessment overview appears. By clicking on the arrow to the right of each scale, a detailed report of how the patient answered each questions appears.

Clicking “Mark Reviewed” will mark the patient assessment as “Completed”.
Not Completed: The patient has been issued an assessment but has not yet completed
Completed: The patient has completed the issued assessment, and the assessment has been reviewed by a member of the practice.
Pending Review: The patient has completed the issued assessment, but the assessment has not yet been reviewed by a member of the practice.
Patient Experience: How does a patient activate their account?
Upon being added into Ellipsas by a practice administrator, the patient will receive an email from the practice, with the subject line: “Action Required: Activate Your Account for your iKare visits”.
The patient will click “Activate My Account”.

A new webpage will open, and the patient will enter the email address associated with their account, their date of birth, and the provider code that was included in the email.

They will click to accept Terms of Use and Privacy Policy and click “Submit”.

Unless the patient is with 48 hours of an appointment, they will have no pending assessments.

Note: A patient does not have to activate their account to participate in the Ellipsas program. However, activating an account will enable the patient to access their account and view aggregated data from all past assessments and download PDF’s.
Patient Experience: What is the patient initial intake and assessment process?
Two (2) days prior to their initial appointment (or, the first appointment entered into Ellipsas), the patient will receive an email asking them to complete a series of questions about their health, health history, demographic information and assessment sales.
The email will come from iKare, with the subject line: “Action Required: Assessment for Your Upcoming iKare Appointment”.
If the patient does not complete their assessment, they will be sent two reminder emails on the following days.
Emails are dispatched at 5am CST.
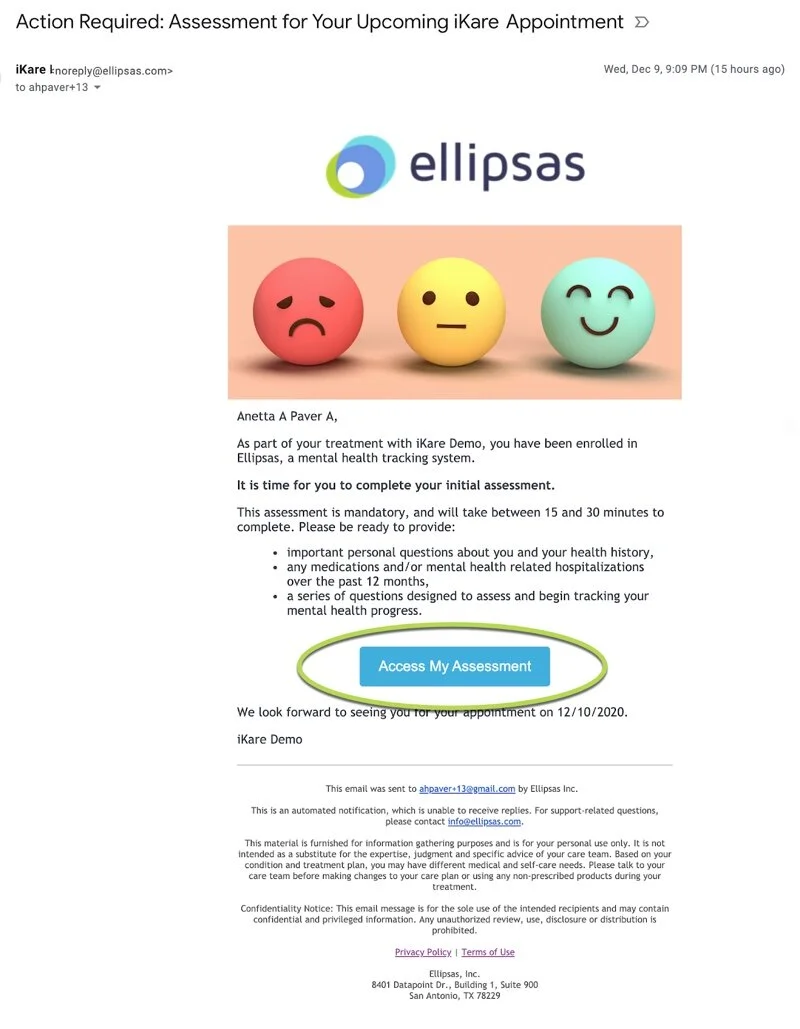
Upon clicking “Access my Assessment”, the patient will be taken directly to their assessment login. They will need to enter only their Date of Birth and click “Get Started” to access the assessment.

The patient will then begin their Intake Questionnaire. This section will only be asked one time.

Questions asked include:
Language preferences
Demographic Information
Pregnancy Questions (if female)
Mental Health History
Medication Questions
PHQ-9 Assessment
GAD-7 Assessment
Mania Assessment
ADHD Assessment
Psychosis Assessment
Alcohol Assessment
Smoking Assessment
Substances Assessment
Memory Assessment
Sleep Assessment
Upon completing their assessment, the patient will receive a notification and have the option to create an account or sign into their account.

Patient Experience: What is the patient prior to and between-appointment assessment process?
Two (2) days prior to each Provider appointment and 14 days following an appointment the patient will receive an email asking them to complete a mental-health assessment through a series of symptom-rating scales.
The email will come from iKare, with the subject line: “Complete your Assessment for your Upcoming Ellipsas Appointment” (for two days prior to appointments) and “Action Required: Time to Complete your Between-Visit Assessment” (14 days following appointments).
If the patient does not complete their assessment, they will be sent two reminder emails on the following days.
Emails are dispatched at 5am CST.

Upon clicking “Access my Assessment”, the patient will be taken directly to their assessment login. They will need to enter only their Date of Birth and click “Get Started” to access the assessment.

The patient will then begin their Symptom-Rating Scale Questionnaire.

Questions asked include:
PHQ-9 Assessment
GAD-7 Assessment
Mania Assessment
ADHD Assessment
Psychosis Assessment
Alcohol Assessment
Smoking Assessment
Substances Assessment
Memory Assessment
Sleep Assessment
Upon completing their assessment, the patient will receive a notification and have the option to create an account or sign into their account.
